This is a tutorial on how to implement a simple image or banner randomizer application that can be used on web pages that calls for a different image every time the page is refreshed. The application is implemented with ASP.NET Core Web API. The Controller handles the GET requests from the browser. Directories and image files are cached for speedy response.
In my old post 3 years ago I talked about caching images in ASP.NET 4.x using HttpRuntime.Cache and using HttpHandler to return a byte array image to the client web page. Today, I will demo a simple image API application that provides a way to request a random image via HttpGet request. This application has been developed in .NET 6.0 and Visual Studio Community 2022 and uses IMemoryCache for caching which is .NET’s in-memory caching service.
You can download the project here.
Requirements
- Knowledge of C#
- Visual Studio Community 2019 or later
Although you can absolutely use Visual Studio Community 2019 for this tutorial if you choose to create the project from scratch, I do recommend using the latest Visual Studio Community 2022 which is the version I developed the demo project in.
How the application works
The image below illustrates how this works. Type the URL on the browser’s address bar to display image immediately. Our endpoint for this application demo is /Image/Random?dirPath=abstract, in which we have a query string where we specify the name of the folder that contains our images. In this case, I have a folder, named abstract, where I have three jpeg files, so, we enter http://localhost:5000/Image/Random?dirPath=abstract in the browser.

On page refresh, you will get a random image.
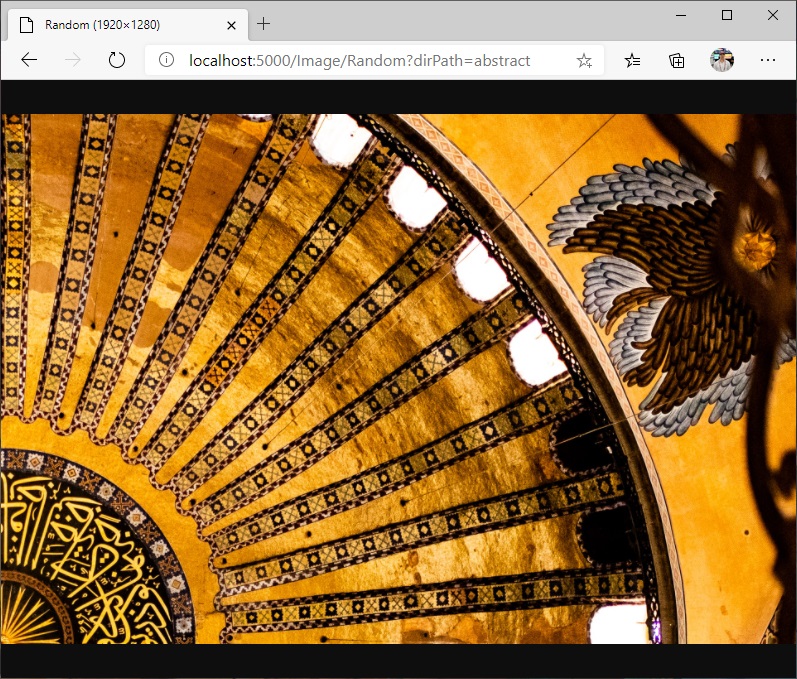
On page refresh again, you will get a random image.

Another way to call API is through JQuery, similar to what I talked about in my old post on my old GitHub page.
Sequence Diagram
Logically speaking, there are three entities that interact in our application – the client, the API, and the caching objects. The caching objects is where most of the work happens because they have to read files from the hard drive, load the image file into a byte array, and cache the images before sending it back to the API. The sequence diagram below explains it much more clearly.
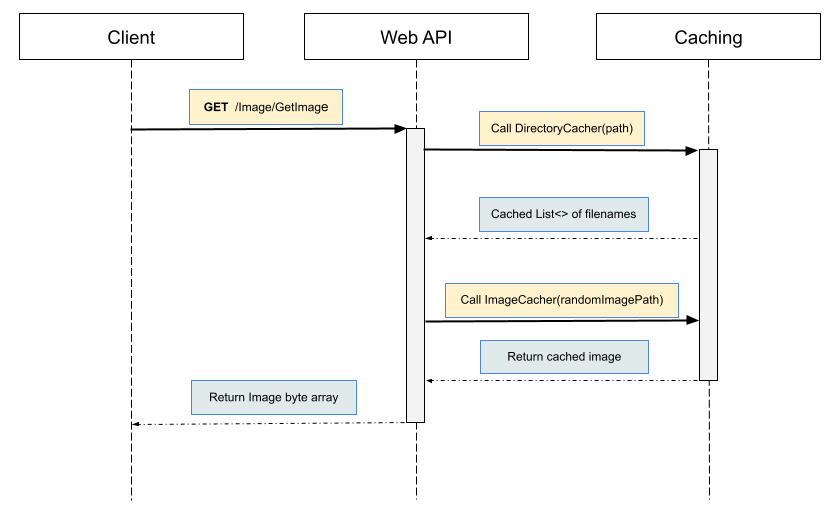
As illustrated in the sequence diagram above, a client application uses the /Image/GetImage endpoint to retrieve a random image from the server.
What’s happening in the sequence diagram
Basically, what generally happens is this:
- Client makes a GET request
- Web API calls DirectoryCacher
- DirectoryCacher caches all image paths in a directory
- DirectoryCacher sends Web API a list of images.
- Web API picks a random image from the list.
- Web API calls ImageCacher.
- ImageCacher caches the image in byte array.
- ImageCacher, sends back the image as byte array to Web API
- Web API returns the image as byte array back to the Client.
Implementation in a Nutshell
Generally, we follow these 4 steps to implement our application. You can click on the link to go directly to one of these steps.
- Implement ImageObject class.
- Implement ImageCacher class.
- Implement DirectoryCacher class.
- Create ImageController.
Visual Studio Setup
For this tutorial, we are going to create an ASP.NET Core Web API project template in Visual Studio because this will give us the minimum configurations to get an Web API application working. I’m using Visual Studio 2022, but you can use the 2019 version if you want to.
Open your Visual Studio. In the 2022 version, you see a window that prompts you to choose what you want to do, as illustrated below.

You want to select “Create a new project”, and in the next window, look for ASP.NET Core Web API, and select it. For project name, enter HttpGetRandomImageWebAPI and for solution name, enter ProjectCache. Of course, you may use any name but I chose those names for my demo.
I’m not going to go over the whole process of project creation, so I recommend reading my previous post called Start a New Project in Visual Studio 2022 and .NET 6.0 which describes how to create two projects within a solution. In that tutorial, I created an ASP.NET Core Web API application, and a Console Application.
After you have finished creating your project, your Solution Explorer should look this:
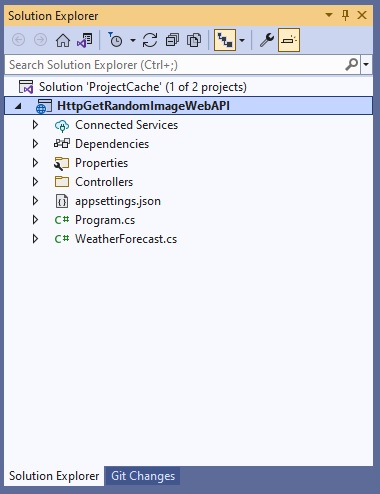
Note that because this is a Web API project it created a Controllers folder for us. It also created a WeatherForecast API for us and if you run the program, it will launch this API. Great way to get beginners started!
Create Images directory
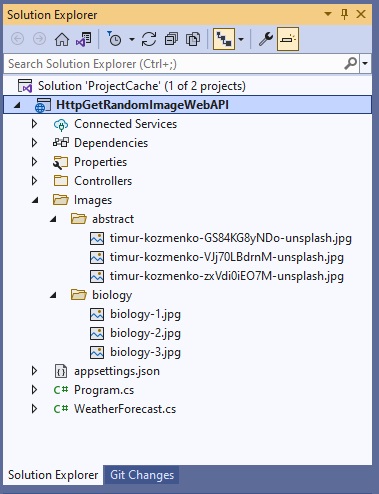
We also need a directory in which to store our images. Create an image directory called Images and place it directly in the root of the application. Create one or more folders in it, and copy images into those folders. For this tutorial, I created two folders – abstract and biology – and I placed at least three jpeg files in each of them, as illustrated below.
Cacher classes
Our caching services will cache directories and images. With regards to directories, we only cache the list of file names(absolute path) of the images contained in them; on the other hand, we actually cache the images in byte array. To start off, we first create these three classes:
- DirectoryCacher
- ImageCacher
- ImageObject
DirectoryCacher will cache a list of filename paths that a directory contains, and ImageCacher will load the images into a byte array before caching them. The ImageObject class is used by the ImageCacher to store information about the images.
Fortunately, I had already implemented the DirectoryCacher and ImageCacher from these previous posts – Simple application to cache directory contents in .NET 6.0 and Simple application to cache images in .NET 6.0, respectively. You can even download DirectoryCacher.cs, ImageCacher.cs, and ImageObject.cs from those projects, and copy them into our project in this tutorial.
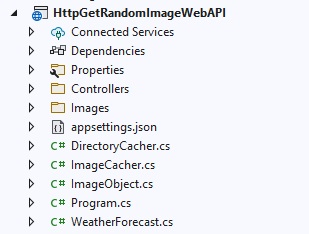
However, if you want to create the files yourself, just right-click on HttpGetRandomImageWebAPI project, click Add, and click Class to create each of those three classes.
In any case, your project should look like this:
ImageObject class
As I mentioned before, The ImageObject class does nothing but stores data; specifically, it stores data coming from ImageCacher. The class is shown below:
using System;
using System.Collections.Generic;
using System.Linq;
using System.Text;
using System.Threading.Tasks;

namespace HttpGetRandomImageWebAPI;

public class ImageObject
{
    public string FileName { get; set; }
    public string ContentType { get; set; }
    public byte[] Content { get; set; }
    public DateTime SubmitDate { get; set; }

    public ImageObject(string fn, string tp, byte[] ct, DateTime dt)
    {
        FileName = fn;
        ContentType = tp;
        Content = ct;
        SubmitDate = new DateTime(dt.Year, dt.Month, dt.Day, dt.Hour, dt.Minute, dt.Second, 0, DateTimeKind.Utc);
    }

}
ImageCacher class
The complete source code for the ImageCacher class is shown below.
using System;
using System.Collections.Generic;
using System.Linq;
using System.Text;
using System.Threading.Tasks;

using Microsoft.Extensions.Caching.Memory;

namespace HttpGetRandomImageWebAPI;

public interface IImageCacher
{
    byte[] GetImage(string pickedImagePath);
}

public class ImageCacher : IImageCacher
{
    IMemoryCache m_memoryCache;
    private ImageObject? m_imageObject;

    public ImageCacher(IMemoryCache memoryCache)
    {
        m_memoryCache = memoryCache;
        m_imageObject = null;
    }

    public byte[] GetImage(string pickedImagePath)
    {

        //string msg = string.Empty;
        if (File.Exists(pickedImagePath))
        {
            m_memoryCache.TryGetValue(pickedImagePath, out m_imageObject);

            if (m_imageObject == null)
            {
                // Read time stamp of file.
                DateTime ourFileDate = File.GetLastWriteTime(pickedImagePath);
                ourFileDate = ourFileDate.AddMilliseconds(-ourFileDate.Millisecond);

                // Open the file and read the contents into a byte array
                byte[] byteArray = File.ReadAllBytes(pickedImagePath);
                m_imageObject = new ImageObject(pickedImagePath, "image/jpeg", byteArray, ourFileDate);

                // Set cache options
                var memCacheEntryOptions = new MemoryCacheEntryOptions().SetSlidingExpiration(TimeSpan.FromSeconds(120));

                // Cache the image
                m_memoryCache.Set(pickedImagePath, m_imageObject, memCacheEntryOptions);

            }
            return m_imageObject.Content;
        }
        else
        {
            throw new FileNotFoundException();
        }

    }
}
This version of ImageCacher is a little different than the console version I implemented from my previous post. The changes include defining an interface on line 11, changing the return value to byte array on line 27 and returning a byte array on line 52 instead of string.
If you’re getting red squiggly lines for references to IMemoryCache such as using Microsoft.Extensions.Caching.Memory, it’s because you need to install the Microsoft.Extensions.Caching.Memory pacakge via Nuget. The easiest way to do this is to right-click on the project, click Manage Nuget Packages, search for Microsoft.Extensions.Caching.Memory, and then install.
While you’re at it, also install Microsoft.Extensions.Hosting because we’re going to need that too.
DirectoryCacher
Our DirectoryCacher class is show below.
using System;
using System.Collections.Generic;
using System.Linq;
using System.Text;
using System.Threading.Tasks;

using Microsoft.Extensions.Caching.Memory;

namespace HttpGetRandomImageWebAPI;

public interface IDirectoryCacher
{
    List<string> GetListCache(string path);
}

public class DirectoryCacher : IDirectoryCacher
{
    IMemoryCache m_memoryCache;

    public DirectoryCacher(IMemoryCache memoryCache)
    {
        m_memoryCache = memoryCache;
    }

    public List<string> GetListCache(string path)
    {
        List<string> cacheList = new List<string>();

        var dirInfo = new DirectoryInfo(path);
        if (dirInfo.Exists)
        {
            m_memoryCache.TryGetValue(path, out cacheList);

            if (cacheList == null)
            {
                BuildCache(path);
                m_memoryCache.TryGetValue(path, out cacheList);
            }
        }
        else
        {
            throw new DirectoryNotFoundException();
        }
        return (List<string>)cacheList;
    }

    private void BuildCache(string path)
    {
        // Get a list of files from the given path
        var extensions = new string[] { ".png", ".jpg", ".gif" };
        var dirInfo = new DirectoryInfo(path);

        List<System.IO.FileInfo> fileInfoList = dirInfo.GetFiles("*.*").Where(f => extensions.Contains(f.Extension.ToLower())).ToList();

        //
        // Check if directory is empty or not
        //
        if (fileInfoList.Count() != 0)
        {
            // Put all file names in our list
            List<string> fileInfo2string = fileInfoList.Select(f => f.FullName.ToString()).ToList();

            // Set cache options.
            var memCacheEntryOptions = new MemoryCacheEntryOptions().SetSlidingExpiration(TimeSpan.FromSeconds(120));

            // Cache the list
            m_memoryCache.Set(path, fileInfo2string, memCacheEntryOptions);

        }
        else
        {
            throw new FileNotFoundException();
        };

    }
}
Just like in ImageCacher, I made a few changes to the DirectoryCacher which includes defining its interface on line 11 so I can pass an instance of of itself to the controller via Dependency Injection, and returning a List on line 44 instead of string. Again, check out the console version of DirectoryCacher from my previous post.
Now that we have our cachers implemented, we are ready to create our Image API that will eventually use these caching services, and we start by creating the ImageController class.
ImageController
I had mentioned earlier that Visual Studio has created WeatherForecast API for us when we created our Web API project; that is, it created WeatherForecastController.cs inside the Controllers folder for us. We now create our own controller, ImageController, inside the same folder by following these steps:
- Right-click the Controllers folder > Add > Controller.
- In the Add New Scaffold Item dialog box, just choose MVC Controller – Empty.
- In the Name box, enter
ImageController.cs. Click Add button to finish.
Initial code
The newly created controller, shown below, does not have anything in it except for the Index() method, and does not do much.
using Microsoft.AspNetCore.Mvc;

namespace HttpGetRandomImageWebAPI.Controllers;
public class ImageController : Controller
{
    public IActionResult Index()
    {
        return View();
    }
}
Pseudocode
What we want our controller to do is request an instance of DirectoryCacher and ImageCacher services as well as use those services to cache a directory and an image before returning to the client with that image. But first, check out the pseudocode for the method to understand how we’re going to implement it.
ImageController(IMemoryCache)
{
}
Random()
{
    Initialize byteArray to 0
    try {
       Specify the directory from which we get the images
       list = DirectoryCacher.GetListCache()
       pick a random file path from list
       byteArray = ImageCacher.GetImage()
    }
    catch(Exception) {
    }
    return byteArray
}
The Random() method shown above is simple because most of the caching routines have been implemented inside DirectoryCacher and ImageCacher. Thus, all it needs to do is pick a random image from the list is the it gets from DirectoryCacher on line 9 and sends it to ImageCacher for caching on line 11. On line 6, I am simply showing that I am defining a byte array variable and initializing it to something so that I’m not returning a null if IO fails.
Actual Implementation
The complete source code is shown below:
using Microsoft.AspNetCore.Mvc;

namespace HttpGetRandomImageWebAPI.Controllers;

[Route("[controller]/[action]")]
public class ImageController : Controller
{
    IImageCacher m_imageCacher;
    IDirectoryCacher m_directoryCacher;
    public ImageController(IDirectoryCacher dirCacher ,IImageCacher imageCacher)
    {
        m_imageCacher = imageCacher;
        m_directoryCacher = dirCacher;
    }

    public IActionResult Index()
    {
        return View();
    }

    [HttpGet]
    public ActionResult Random(string dirPath)
    {
        string msg = string.Empty;

        if (dirPath != null)
        {
            byte[] byteArray = { byte.MinValue };
            try
            {
                string localPath = Path.Combine(Environment.CurrentDirectory, "Images", dirPath);

                List<string> listCache = m_directoryCacher.GetListCache(localPath);

                // Get a random filename from the cache
                string pickedRandomImage = PickRandomFromCache(listCache);

                byteArray = m_imageCacher.GetImage(pickedRandomImage);
            }
            catch (Exception ex)
            {
                // Log something
            }
            return File(byteArray, "image/jpeg");
        }
        else
        {
            return Content("Specify directory!");
        }
    }
    private string PickRandomFromCache(List<string> collection)
    {
        // Pick random file
        Random R = new Random();
        string imagePath = string.Empty;
        int randomNumber = R.Next(0, collection.Count());
        imagePath = collection.ElementAt(randomNumber);
        return imagePath;
    }

}
How to use DirectoryCacher and ImageCacher
In our constructor, on line 10, we request instances of the IDirectoryCacher, and IImageCacher services.
On line 33, we call GetListCache() and pass it the directory path containing the images. From that, we get a list of file paths, and we pick a random image path from that list on line 36. We, then, call GetImage() on line 38, which converts the path to ImageObject, caches the ImageObject, and then returns to us the image in byte array.
Routing
Because I want my endpoint to be /Image/Random, I am using attribute routing on line 5, where I say [Route("[controller]/[action]")], in which controller refers to ImageController, and action refers to Random() method. Also, on line 21, I specify that Random() is our GET method.
Although, our application is not technically RESTful, we are using attribute routing as mentioned in Microsoft Docs:
REST APIs should use attribute routing to model the app’s functionality as a set of resources where operations are represented by HTTP verbs.
Ryan Nowak, Kirk Larkin, and Rick Anderson. Routing to controller actions in ASP.NET Core. March 2020.
Returning a Byte Array as ActionResult
Finally, on line 44 we use the ControllerBase.File method to return our byteArray (as the fileContents), as well “image/jpeg” as the contentType. Specifically, it returns a FileContentResult.
The namespace of this File method is Microsoft.AspNetCore.Mvc. You can read more about this namespace in the Microsoft Docs page.
Main Program
Right now, if you enter http://localhost:5000/Image/Random?dirPath=abstract in your browser, you will get an error page, and that is because we have not registered the in-memory caching service, and we have not registered our DirectoryCacher and ImageCacher services.
Open Program.cs and add lines 7, 8 and 9, where I register the MemoryCache, ImageCacher, and DirectoryCacher services.
using HttpGetRandomImageWebAPI;

var builder = WebApplication.CreateBuilder(args);

// Add services to the container.
builder.Services.AddControllers();
builder.Services.AddMemoryCache();
builder.Services.AddSingleton<IImageCacher, ImageCacher>();
builder.Services.AddSingleton<IDirectoryCacher, DirectoryCacher>();

var app = builder.Build();

// Configure the HTTP request pipeline.
if (builder.Environment.IsDevelopment())
{
    app.UseDeveloperExceptionPage();
}

app.UseAuthorization();

app.MapControllers();

app.Run();
Brief explanation of Singleton services
As you can see above, I registered both ImageCacher and DirectoryCacher as Singleton services because I want only one instance of these services for all incoming requests. You can read more about the lifetime of a service in this Microsoft Docs page.
Notice, that under the comment //Configure the HTTP request pipeline are the following middleware:
- Authorization
- MapControllers
- Run
(Note that you may or may not have the Swagger service added into your project by Visual Studio, depending on how you created your project. )
Launching Settings (optional)
To make your new API execute by default when you run it or hit F5, open your launchSettings.json file inside Properties folder, and change the value of launchUrl property to "Image/Random", like so:
"profiles": {
    "HttpGetRandomImageWebAPI": {
      "commandName": "Project",
      "dotnetRunMessages": true,
      "launchBrowser": true,
      "launchUrl": "Image/Random",
      "applicationUrl": "http://localhost:5000",
      "environmentVariables": {
        "ASPNETCORE_ENVIRONMENT": "Development"
      }
    },
    "IIS Express": {
      "commandName": "IISExpress",
      "launchBrowser": true,
      "launchUrl": "Image/Random",
      "environmentVariables": {
        "ASPNETCORE_ENVIRONMENT": "Development"
      }
    }
  }
By default, the application uses port 5000 to listen for requests, but you may change this if you want. I prefer to leave it as it is.
Run it
Hit F5 or click the green arrow on top to run your application. Your browser should open to http://localhost:5000/Image/Random. If everything went well, it should open a browser and display random images.
Testing if caching works
How do you know if you’re getting cached images or not? Debug it! We are caching in-server and not in-browser, and for this reason the inspector of your browser will not show anything in its cache. During debug, put a breakpoint where you’re reading from local drive and where it is being bypassed (reading from cache).
Conclusion
This tutorial showed how to implement an “Image API” that caches directory contents and images and allows you to request random images from the remote server. We learned how to accomplish this with the use of MemoryCache (.NET’s in-memory caching service), and use of Dependency Injection to get an instance of this service. We also learned how to register services with ASP.NET Core’s WebApplicationBuilder. And finally, we had a little taste of the new .NET 6.0 and Visual Studio 2022.
